


Step-by-step process
Hand block printing is an artisanal technique of India. This tradition has been practiced for decades. This type of fabric printing involves the use of carved wooden blocks where beautiful patterns are created by pressing the carved wooden block onto the fabric one by one.


Block Carving —
Mainly from Rajasthan, India these block carving skills are passed down from generation to generation. With the help of small hammers, chisels and drills, these artisans create beautiful carved patterns into the wooden blocks. The intricacy of the design shows the amount of time it took in the making of it. For each individual color there is a separate block. Once the blocks are made they are kept in mustard oil for about one week to set. This insures the block won't crack during the drying process. The carvers drill holes into the wooden block to extend its life.

Preparation of fabric for printing —
Once the block is in the making, the printers work parallel to start on the fabric treatment so it's ready for printing. First, the fabric is dipped in water for a minimum of 3 days. This is done so that the starch of the fabric can be removed. Once this is finished, the fabric is dried in natural sunlight. No artificial heat or lights are used.
After the fabric is dry, it is dipped into water with a mustard color for 15 minutes so the fabric can absorb it. The fabric comes out with a slight yellowish tint, this mustard color coating helps the vegetable colors to penetrate on the base of the fabric nicely. Then once again the fabric is left outside in sunlight to dry.


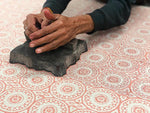
Block Printing in vegetable dyeing —
The dry fabric is laid on tables and held in place with tiny pins, so it's prepared for printing.

The wooden block is dipped into a container of the color and pressed onto the fabric. Since this printing has a certain technique there is a process that needs to be followed. The printing always starts from left to right. The block is dipped in the dark color and applied on the fabric by the craftsmen. A beautiful impression is achieved with the forceful action of using a clenched hand on the back of the handles. This technique is repeated over and over again along the length and width of the fabric. Once the printing process is finished, the craftsmen sprinkle saw dust onto the fabric, this prevents unevenness and seals the finished design. The final fabric then goes back outside to dry.


Washing and steaming —
Once the printed fabric is dry, it's washed in normal water for up to 4 hours.
After washing, the fabric is steamed. Tamarind leaves and alka color are mixed together in water for the steaming process. This helps fix the color and also helps in softening the fabric. After steaming the fabric dries outside once again.

Indigo Printing Technique —
For the indigo color print technique, mud is used to block the natural fabric from getting dyed in the indigo dye vessel. After the mud is applied it is dried under the sun before being dipped into the dye vessel of indigo water. At this point craftsmen constantly stir the fabric with wooden sticks to keep the fabric moving and absorbing the dye evenly. The last stage is letting the fabric dry in sunlight, revealing the print against the blue ground color of the indigo.
Once the fabric is dry, it's washed for a minimum of 3 hours, in which the mud is removed. The fabric is dried outside and once finished, it’s ironed and sent out to its dispatching units.
Woodblock Colors —
The main colors used are black, red, yellow, green, brown and indigo.
Below is the material from which these colors are made;
1. Red – made from tree gum and alum
2. Green – made from pomegranate and turmeric.
3. Yellow – made from turmeric
4. Black – made from horse shoe and jaggery
5. Brown – made from tamarind seeds, jaggery and black water
6. Indigo – made from indigo seeds
7. Mud used for printing – fullers earth and black mud.